this is a reply to @upupzealot asking for more details about this pen.
there is no random so to speak, the PRNG (Pseudo Random Number Generator) creates a seed-based (& therefore reproductible) series of seemingly random numbers.
the first thing I do, line 1 is to create a self contained PRNG object (it’s a Mersenne twister btw):
|
1 |
var PRNG = function( exports ) |
then I set up a canvas / context, nothing special.
in the update() function, the first thing I do is to reset the PRNG value: PRNG.setSeed(3); to make sure I’ll get the same random sequence each time.
then the first loop creates vertices (2D points)
it’s done in 2 steps, first create count points (lattices) around the center at a random angle a and a random radius r.
then create spawn points around this lattice also at a random angle but with a much smaller radius offset.
|
1 2 3 4 5 6 7 8 9 10 11 12 13 14 15 16 17 18 19 20 21 22 23 24 25 26 27 28 29 30 31 32 33 34 35 36 37 38 39 |
var r, a, v, o; var count = 20; var spawn = 40; var offset = 100; vertices = []; for( var i = 0; i < count; i++ ){ r = ( PRNG.random() - .5 ) * window.innerWidth / 2; // NB (i%2==0?-1:1) flips the direction of every other particle. // the "even" lattices rotate clockwise // and "odd" lattices rotate counter clockwise. a = (i%2==0?1:-1) * Date.now() * 0.0001 + PRNG.random() * Math.PI * 2; //create a vertex: an array where [0] is x and [1] is y v = [ Math.cos( a ) * r, Math.sin( a ) * r ]; // unshift() is like push() but at the biginning of the array vertices.unshift( v ); //this is where the "children" are build around the lattice for( var j = 0; j < spawn * ( .5 + PRNG.random() ); j++ ){ r = PRNG.random() * offset; a = (j%2==0?-1:1) * Date.now() * 0.0002 + PRNG.random() * Math.PI * 2; // as the lattice was "unshifted()" to vertices and not pushed, // it is at position 0 in the array, so vertices[0] is the point we created above o = vertices[ 0 ]; //we use it as the center to position this vertex v = [ o[0] + Math.cos( a % r ) * r, o[1] + Math.sin( a % r * 2 ) * r ]; vertices.push( v ); } } |
then we have some context reset and we call yolo a given amount of times so it renders at different scales.
|
1 2 3 4 5 |
var m = size/8; for( i = 8; i <= m; i *= 2 ){ ctx.globalAlpha = (1 - i/m) * .1; yolo( vertices, i, size, size ); } |
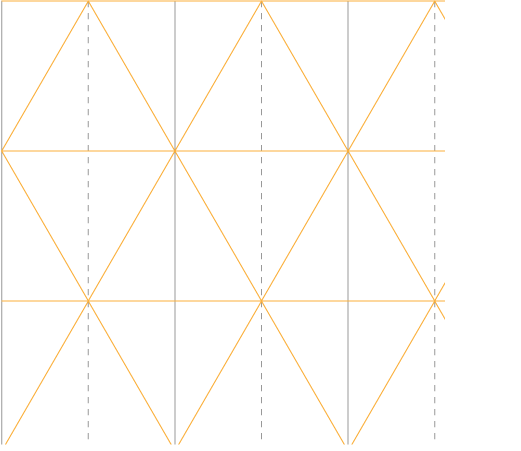
the yolo() method will build a virtual equilateral triangles’ grid to determine the closest lattices of the grid to each vertex then decide how to render it. it can be either:
- a line from the vertex to the closest lattice of the grid
- the closest edge of the grid without connection to the vertex
- a filled triangle between the 3 closest points of the grid
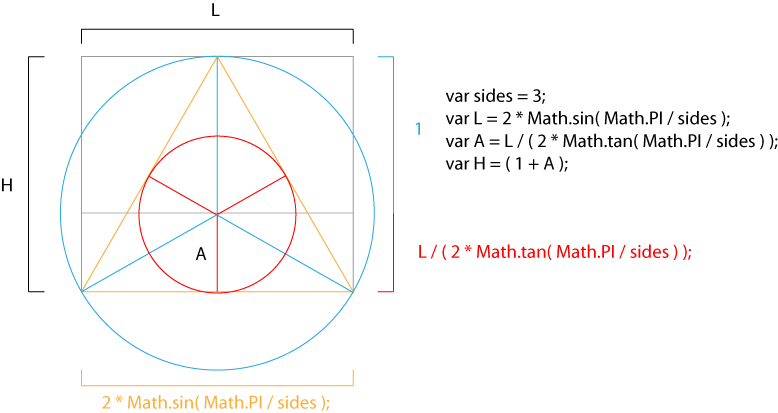
to compute the equilateral triangles grid, we need to compute some variables, especially an equilateral triangle side length and height.
note that this also work for N-sided regular polygons, in this case we have 3 sides.
|
1 2 3 4 5 6 7 |
function yolo( vertices, size, _w, _h ){ //measures of an equalateral triangle var sides = 3; var l = 2 * Math.sin( Math.PI / sides ); //side length var a = l / ( 2 * Math.tan( Math.PI / sides ) ); //apothem var h = ( 1 + a ); //radius + apothem |
here’s a visual helper for the values above:

we now have the dimensions of a module that contains a triangle, and with this module, we can build a grid like this:

|
1 2 3 4 5 6 7 8 9 10 11 12 13 |
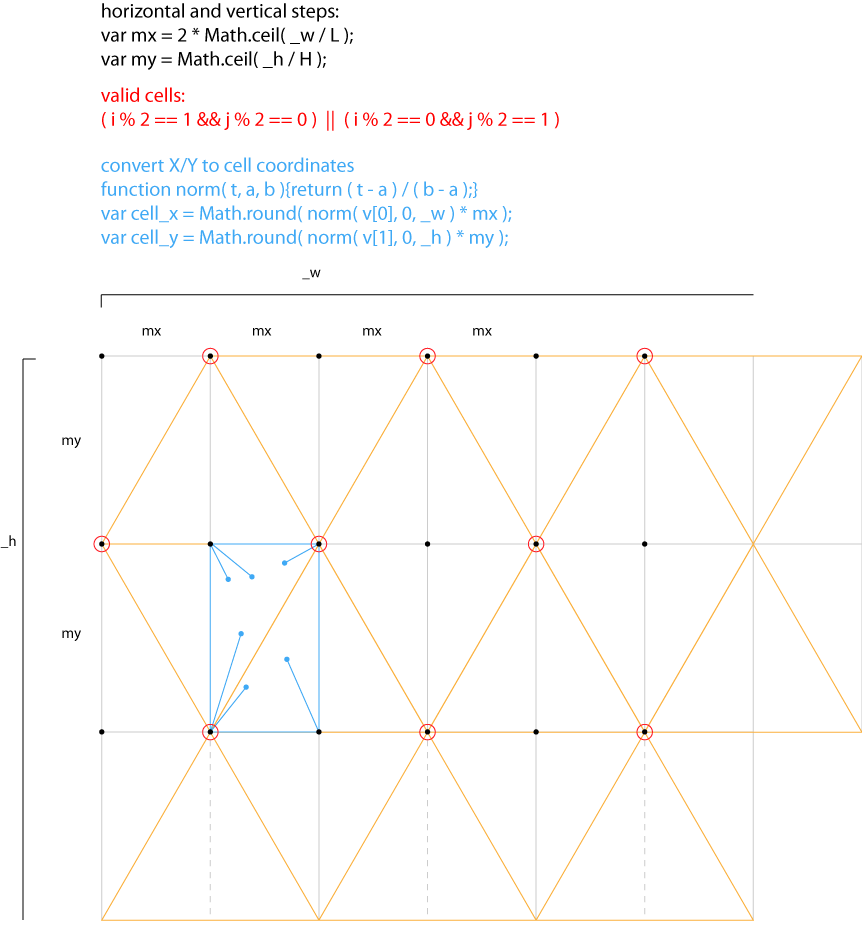
size = size || 1; l *= size; h *= size; var mx = 2 * Math.ceil( _w / l ); var my = Math.ceil( _h / h ); var fills = []; ctx.beginPath(); vertices.forEach( function( v ){ var cell_x = Math.round( norm( v[0], 0, _w ) * mx ); var cell_y = Math.round( norm( v[1], 0, _h ) * my ); |
having a rectangular grid helps a lot when it comes to finding which is the closest lattice.
for instance cell_x & cell_y can tell us which is the closest lattice without the usual minimum distance computation.
the illustration below show what the code above correspond to:

once we found which celle the vertex belongs to, we can iterate only on the neighbour cells to find the closests valid lattices. that’s why the loop ranges from cell_x-2 to cell_x+2 & cell_y-2 to cell_y+2. this saves a lot of computations.
|
1 2 3 4 5 6 7 8 9 10 11 12 13 14 15 16 17 18 19 20 21 22 23 24 25 26 27 28 29 30 31 32 33 34 35 36 37 38 39 40 41 42 43 44 45 46 47 48 49 50 51 52 53 54 55 56 57 58 59 60 61 |
var md = Number.POSITIVE_INFINITY, d, x, y, ix, iy, ps = []; for( var i = cell_x - 2; i < cell_x + 2; i++ ){ for( var j = cell_y - 2; j < cell_y + 2; j++ ){ if(( Math.abs( i ) % 2 == 1 && Math.abs( j ) % 2 == 0 ) || ( Math.abs( i ) % 2 == 0 && Math.abs( j ) % 2 == 1 ) ){ // here we found a valid lattice in the cells surrounding our point, // we can check the lattice-vertex distance and store it in a temporary array (ps). ix = ( i ) * l/2; iy = ( j ) * h; d = squareDistance( [ix,iy], v ); if( d < md ){ md = d; x = ( i ) * l/2; y = ( j ) * h; ps.unshift( x, y ); } } } } //now we have what we need to render the vertex. //50% chance to draw a lattice-vertex line if( PRNG.random() > .5 ){ ctx.moveTo( v[0], v[1] ); ctx.lineTo( ps[0], ps[1] ); }else{ //50% chance to draw the closest edge to the vertex ctx.moveTo( ps[0], ps[1] ); ctx.lineTo( ps[2], ps[3] ); //and 5% of 50% chance to draw a filled triangle if( PRNG.random() > .95 ){ fills.push( ps ); } } } ); ctx.stroke(); //we draw all the filled triangles at once ctx.beginPath(); ctx.fillStyle = "#FFF"; fills.forEach( function(ps){ ctx.moveTo( ps[0], ps[1] ); ctx.lineTo( ps[2], ps[3] ); ctx.lineTo( ps[4], ps[5] ); ctx.lineTo( ps[0], ps[1] ); }); ctx.fill(); } |
the important thing to remember is that there is no random but Pseudo random and time. Since it’s always the same sequence of random numbers, the ‘random’ chances of drawing, an edge or a triangle are always the same ; it doesn’t flicker like it would if we had used a regular Random function.
and that’s it! :)
Hello Nico
Always happy to discover a new post on your blog :)
I’m back on Paris since October, do you have some time for a beer ?
(by the way, I still have your shader-book if you want to get it back…)