I worked for the past 3 months on a website with the good people at Upian for the good people of La Fondation Cartier, pour l’art contemporain.
It is called: Le Grand Orchestre Des Animaux (The Great Animal Orchestra) and is based on the work of Bernie Krause, a man who dedicated his life to recording the sounds of nature and raising awareness about its degradation through time in a striking manner.
This project is not advertising. I’m used to short lived and rather pointless websites, this one is supposed to live (virtually) forever and conveys a powerful message. This changes the way we did it, we had more time, we discussed a lot. As a dev, I had a word to say about how I thought things should go, even on the conceptual level. It is unfrequent and very enjoyable.
Sound
The core material of the website is sound, it’s the raison d’être, the pivot of this experience. First we discussed about using the WebAudio API to perform spectrograms, cross blends, 3d panning and all sorts of weird filtering but it didn’t quite fit with the work of Bernie Krause. Instead we chose a more respectful approach to the sound material and no real-time alteration.
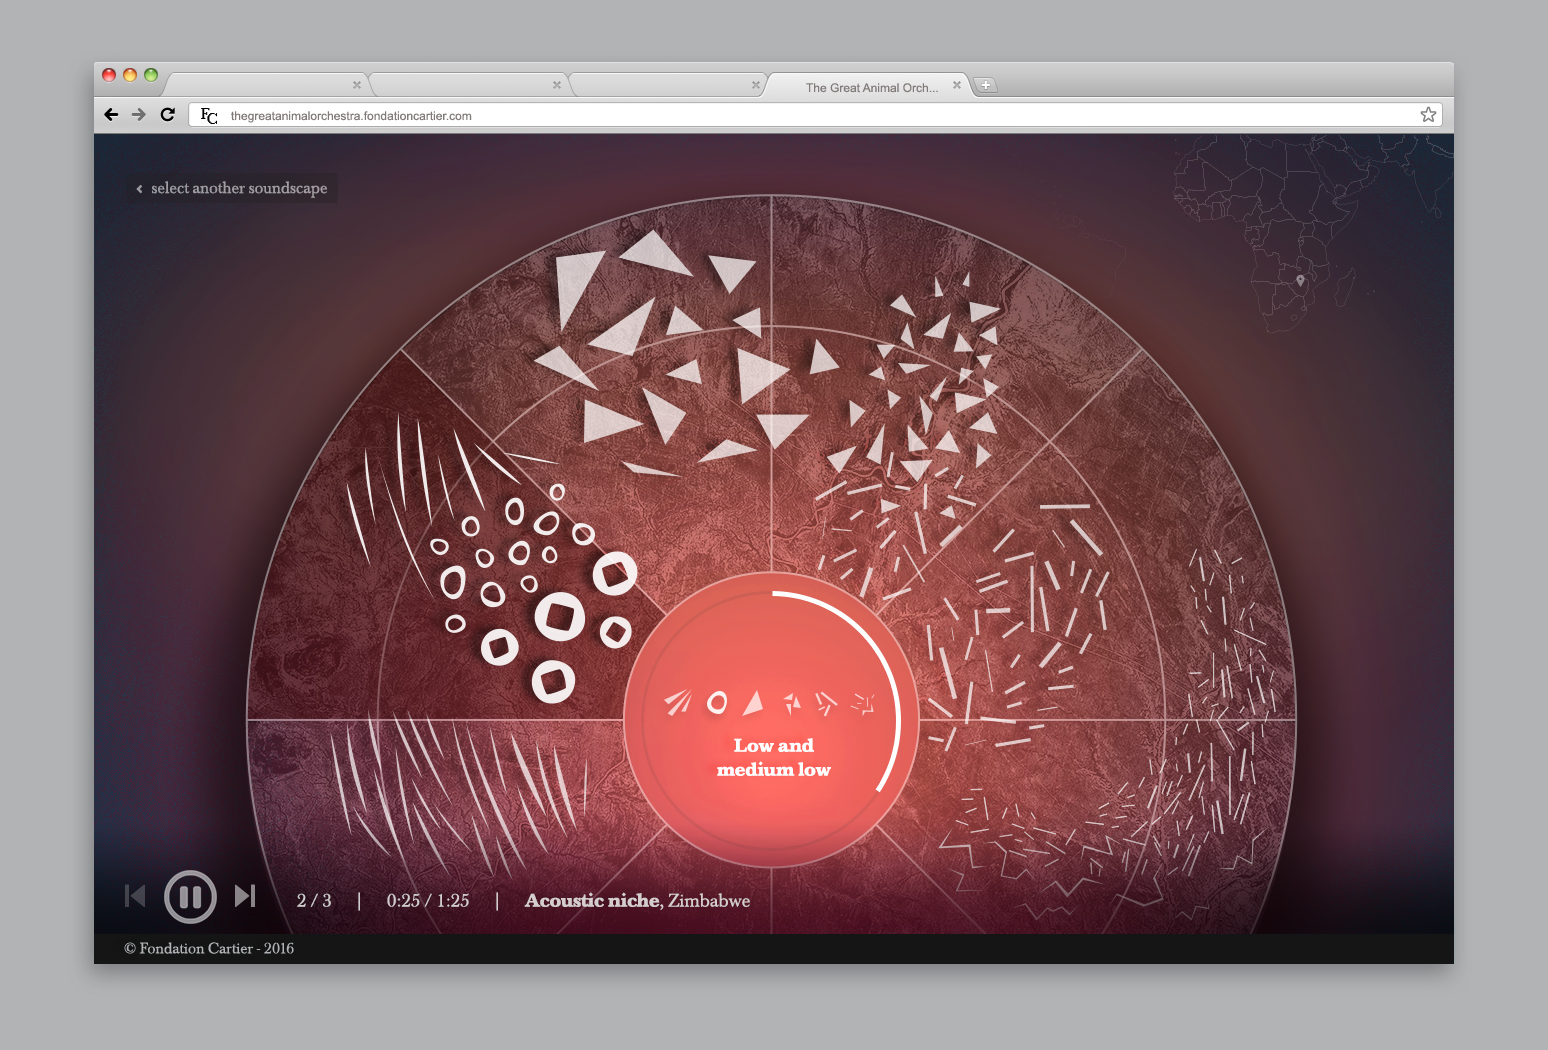
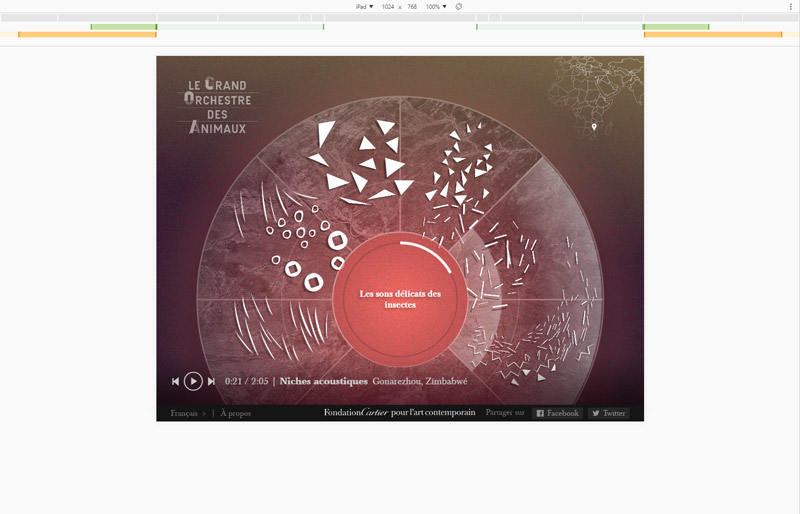
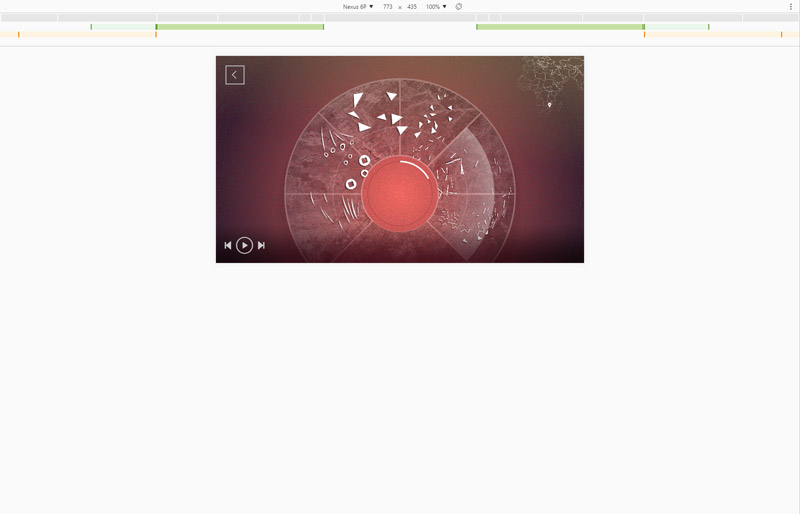
I was not in charge of the sound production – we left it to a professional – yet I know that he used the spectrograms to isolate animal species and split each track into sets of tracks by frequencies. the sound frequencies are distributed like the instruments in an orchestra, as seen from above, the slices or partitions represent given sets of frequencies corresponding to differents sets of animals vocalizations that in turn correspond to sets of instruments in an actual orchestra (the intro video explains this quite clearly).
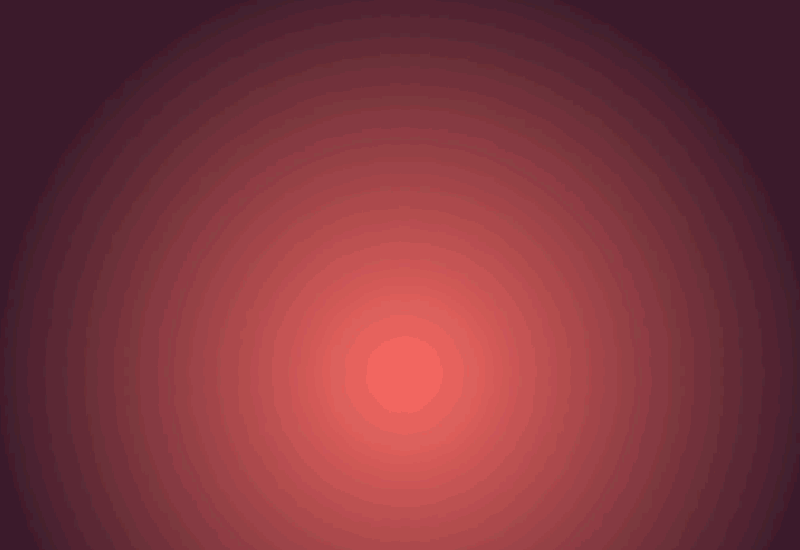
here’s how the frequencies are distributed in the orchestra, each type of animal occupies a given space or as Bernie Krause puts it, an “acoustic niche”.

The mobile version uses the WebAudio API (WAA) to get slightly better playback synchronisation but the desktop uses regular Audio tags to remain compatible with older browsers. The WAA comes at a cost as each audio track must be somehow decompressed once loaded. As all we needed was crossfades, there was little reason to use the WAA. The rest is a fairly regular multitrack playback “engine”, with multitrack resync and a selective batch crossfade.
For a better balance of the tracks, I came to lower the overall volume of all track and have the ability to set each track’s volume separately, the JSON looked like:
|
1 2 3 4 5 6 7 8 |
"volumes" : [ { "default": 0.715, "hover":1.000, "out": 0.25 }, { "default": 0.715, "hover":1.000, "out": 0.25 }, { "default": 0.715, "hover":0.858, "out": 0.25 }, { "default": 0.715, "hover":0.715, "out": 0.25 }, { "default": 0.715, "hover":0.715, "out": 0.25 }, { "default": 0.715, "hover":0.715, "out": 0.25 } ], |
the “default” state volume is not 1 but 0.715 which roughly corresponds to a global volume turned down by 40%. The “hover” volume emphasizes individual tracks on rollover (or tap), some are so low that they needed to be amplified up to 140% which corresponds to a volume of 1. Apart from this, all I did was to use Howler and Circular easeIn / easeOut crossfades as they sound more natural than linear easings.
Graphics
At first sight it may not seem like much as there is no fancy 3D graphics or rock’n roll animations but it’s one of the most complex websites I had to work on. I’ll review some of the solutions that were adopted so that the app works as well as possible on various platforms.
Below is one of the original designs, one would call it a simple setup yet if you look carefully, many different layers build up the final image.
A gradient in the background that appears in the central disc, a blue-ish grain, a drop shadow to emphasize the central disc, bright semi-transparent outlines, a colored halo at the bottom of the page to emphasize the playback controls, some colored halos where it’s hard to tell whether they’re part of the foreground or the background, a greyscale, semi transparent image in the background and some subtle hues variations and overlays of sprites with drop shadows. All of which contribute to the elegance of the final picture.
As usual, before starting the production and in order to obtain an identical cross-browser / cross platforms render of the visual, I decided to perform some R&D.
in the browsers’ jungle
My first thought was to use SVG as it is well supported across browsers and allows for blend modes and other filters (desaturation, blur, shadows) that were present here and there in the original designs. here’s what my test page looked like on 4 different browsers (left to right, top bottom: FireFox, Edge, Chrome & Internet Explorer 11, PC, Windows 10 ).

It’s easy to spot some of the differences but also to miss some of them, here’s a list from the most obvious to the most subtle:
- the rendering of the blue animals pictograms, they use an “additive blendmode”, from a browser to the next the behaviour changes quite badly ; sometimes they’ll blend nicely, sometimes they’re opaque, sometimes it’s a bit of each (FF, top left). In addition the vector shapes themselves are not rendered correctly (top left duck).
- the color gradient disc, same as above, the blendmode is supported in various ways depending on the browser. On IE it becomes very dull and basically brown, on FF, the opacity is not properly computed and the gradient covers its background too much.
- the semi transparent disc at the back should behave “normally” as no blendmode is applied to it, halas, the bottom right version is slightly lighter than the others (probably due to the additive overly being actually computed as opposed to the others).
- the first line of pictograms uses an “effect” ; I drew them with a texture supposed to mimic a watercolor. Surprisingly, the result was pretty close among browsers yet all browsers but IE (bottom right) tend to make the edges crispy and pixelated.
- the cat’s “slices” (the geometric spiral) does not behave the same, on IE & Edge (right column), some slices simply disappeared (near the circle’s center top).
- The cat picture is a color picture, desaturated on the fly and again there are some variations as to how the conversion is done.
Multiplied by the number of browsers, by the number of devices and by the number of OSes, there were way too many differences and unknown factors as to how the visuals would be rendered.
We had to rework the pages designs practically from scratch, which pushed the art directors out of (and quite far away from) their comfort zone. They reworked all the designs without using blendmodes at all and using no other “effect” than opacity variations. Somehow, this is a very pure way of building the visuals which suited the website’s purpose quite well ; it would be like using only natural pigments in an artwork.
layers. lots of them.
With a naive approach, it took about 20+ layers to build the final visual. After regrouping some draw calls into batches, only 7 to 8 remained, namely:
1 background
2 color grain

3 desaturated semi transparent satellite view

4 color halos

5 abstract pictograms
6 central disc
7 footer color gradient

+
8 potentially an overlay
this GIF sums up how the image is built.
Further improvements included:
- each vector based layer is drawn (background and colors halos mostly) is rendered at a 16th of its display scale, the bilinear interpolation is performed by the hardware and preserves the smoothness of the gradients while sparing some resources
- the last pass of the color halos is a grain pattern, it is drawn at full resolution instead of a 16th to prevent artefacts
- when a picture needs to be drawn (halo layer or overlays), it’s written directly on the final canvas at full scale
- the grain are small (256² pixels) canvases used as patterns by the context
- every layer is maintained and updated offscreen
- all layer are blitted to a single canvas
Despite the efforts we made to get it to work as fast as possible on mobile devices (mostly downgrading the visual quality by removing layers), the website will work best on desktop.
On a side note, I discovered that an image pattern (ctx.createPattern) created on a context could be used on another context which is handy when you want to share resources. Also, the gradient patterns are very cheap to setup (fractions of a millisecond), this was good news for what follows.
gradients. lots of them.
In the above example, the color halos layer is by far the most complex ; it can be made of up to 12 different gradients, each of which can be made of 3 to 9 color & alpha steps and can contain image overlays. Overmore, each module offers 3 variations of these settings.
Instead of importing rastered images of the gradients, we chose to encode the gradients in JSON files and to redraw them on fly. This way we could easily perform color transitions between the different “times” of each module.
Here’s a sample of the JSON describing the background, the color halos, the overlays and the footer gradient of the second module ([…] means there’s more).
|
1 2 3 4 5 6 7 8 9 10 11 12 13 14 15 16 17 18 19 20 21 22 23 24 25 26 27 28 29 30 31 32 33 34 35 36 37 38 39 40 41 42 43 44 45 46 47 48 49 50 51 52 53 54 55 56 57 58 59 60 61 62 63 64 65 66 67 68 69 70 71 72 73 74 75 76 77 78 79 80 81 82 83 84 85 86 87 88 89 90 91 92 93 94 95 96 97 98 99 100 101 102 103 |
"backgroundColors" : [ { "name":"m2_yellow_blue_bg_2", "type" : "linear", "angle" : 120, "colorsteps" : [ { "step":0, "r": 45, "g": 90, "b": 119, "a": 1 }, { "step":0.25, "r": 45, "g": 90, "b": 119, "a": 1 }, { "step":0.51, "r": 103, "g": 128, "b": 156, "a": 1 }, { "step":0.73, "r": 181, "g": 158, "b": 99, "a": 1 }, { "step":1, "r": 181, "g": 158, "b": 99, "a": 1 } ], "alphas": [ 1, 0, 0 ] }, [...] { "name":"m2_dk_nd_lg_multi_bg_1", "type" : "linear", "angle" : 105, "colorsteps" : [ { "step":0, "r": 98, "g": 94, "b": 0, "a": 1 }, { "step":0.19, "r": 98, "g": 94, "b": 0, "a": 1 }, { "step":0.38, "r": 28, "g": 19, "b": 0, "a": 1 }, { "step":0.45, "r": 45, "g": 35, "b": 0, "a": 1 }, { "step":0.52, "r": 45, "g": 35, "b": 0, "a": 1 }, { "step":0.59, "r": 202, "g": 94, "b": 44, "a": 1 }, { "step":0.63, "r": 255, "g": 66, "b": 46, "a": 1 }, { "step":0.88, "r": 11, "g": 10, "b": 10, "a": 1 }, { "step":1, "r": 11, "g": 10, "b": 10, "a": 1 } ], "alphas": [ 0, 1, 1 ] } ], "halos" : [ { "name":"m2_blue_white_red_hl_3", "type" : "linear", "angle" : -120, "colorsteps" : [ { "step":0, "r": 130, "g": 102, "b": 95, "a": 1 }, { "step":0.10, "r": 130, "g": 102, "b": 95, "a": 1 }, { "step":0.30, "r": 117, "g": 115, "b": 125, "a": 1 }, { "step":0.51, "r": 103, "g": 128, "b": 156, "a": 0 }, { "step":0.68, "r": 68, "g": 70, "b": 103, "a": 1 }, { "step":0.81, "r": 218, "g": 171, "b": 254, "a": 1 }, { "step":1, "r": 218, "g": 171, "b": 254, "a": 1 } ], "alphas" : [ 0.79, 0, 0 ], "time":0 }, [...] { "name":"m2_multi_hl_7", "type" : "linear", "angle" : -117, "colorsteps" : [ { "step":0, "r": 88, "g": 41, "b": 0, "a": 0 }, { "step":0.12, "r": 88, "g": 41, "b": 0, "a": 0 }, { "step":0.21, "r": 0, "g": 0, "b": 0, "a": 1 }, { "step":0.25, "r": 118, "g": 44, "b": 19, "a": 1 }, { "step":0.30, "r": 125, "g": 32, "b": 0, "a": 1 }, { "step":0.51, "r": 88, "g": 41, "b": 0, "a": 0 }, { "step":0.75, "r": 180, "g": 153, "b": 72, "a": 0.50 }, { "step":0.80, "r": 180, "g": 153, "b": 72, "a": 1 }, { "step":1, "r": 180, "g": 153, "b": 72, "a": 1 } ], "alphas": [ 0, 0.93, 0.93 ] }, { "name":"m2_black_hl14", "type" : "linear", "angle" : 90, "colorsteps" : [ { "step":0, "r": 0, "g": 0, "b": 0, "a": 0 }, { "step":0.40, "r": 0, "g": 0, "b": 0, "a": 0 }, { "step":0.63, "r": 0, "g": 0, "b": 0, "a": 1 }, { "step":1, "r": 255, "g": 255, "b": 255, "a": 0 } ], "alphas": [ 0.25, 0, 0 ] } ], "overlays" : [ { "name":"m3_vignette_effect_ol_15", "type" : "img", "url": "assets/img/modules/module2/m2_vignette_effect_ol_15.png", "alphas": [ 1, 1, 1 ] }, { "name":"m3_vignette_effect_ol_16", "url": "assets/img/modules/module2/m2_vignette_effect_ol_16.png", "type" : "img", "alphas": [ 0.26, 0, 0 ] } ], "haloFooter" : [ [ "#3c1b2c", "#fd6c64", "#fd6c64", "#3c1b2c" ], [ "#4f1c1e", "#ec905a", "#ec905a", "#4f1c1e" ], [ "#202020", "#4f1c1e", "#4f1c1e", "#202020" ] ], |
This verbose format is quite far from art direction but allowed us to fine tune some settings directly in the browsers. It was nice to have graphists and art directors who played the game ; for once we were using the target media to approach the original design instead of trying to reproduce Photoshop files in the browser.
This tedious, careful and time-consuming work allowed us to stay as close as possible to the original designs, on all platforms.
Animation
From the very beginning, I knew there would be a great deal of animations, the abstract shapes representing the animals would have to “live”. To achieve this we used various techniques ranging from traditional to procedural animation.
SVG? NOPE!
As mentioned above, my first tests were done in SVG. theoretically, SVG is well supported and allows for both rich rendering and provide unified animation system. Now that’s the theory…
in practice it’s slugishly slow, even on the finest browsers, the filters / features are vendor dependant, some simply do not exist or do not work. Even though the shapes are supposed to be cleverly handled in memory (at least for translations and rotations).
We needed a lot of dynamic shapes from the “partitions” of the home page to each and every gradient that are constantly animated in the background. So for this specific use case, the SVG was not the appropriate tool and I chose to blit a canvas, like cool cats do.
Many a time, I dreamt of having the right to use a WebGL context because you know… WebGL…
respecting the media
The sound is crucial here, so in order not to misrepresent the sound material and on the contrary underline its qualities, we chose a traditional approach based on timelines. In After Effects, we created a timeline for each family of abstract symbol of each soundtrack of each module. here’s what a composition looked like:
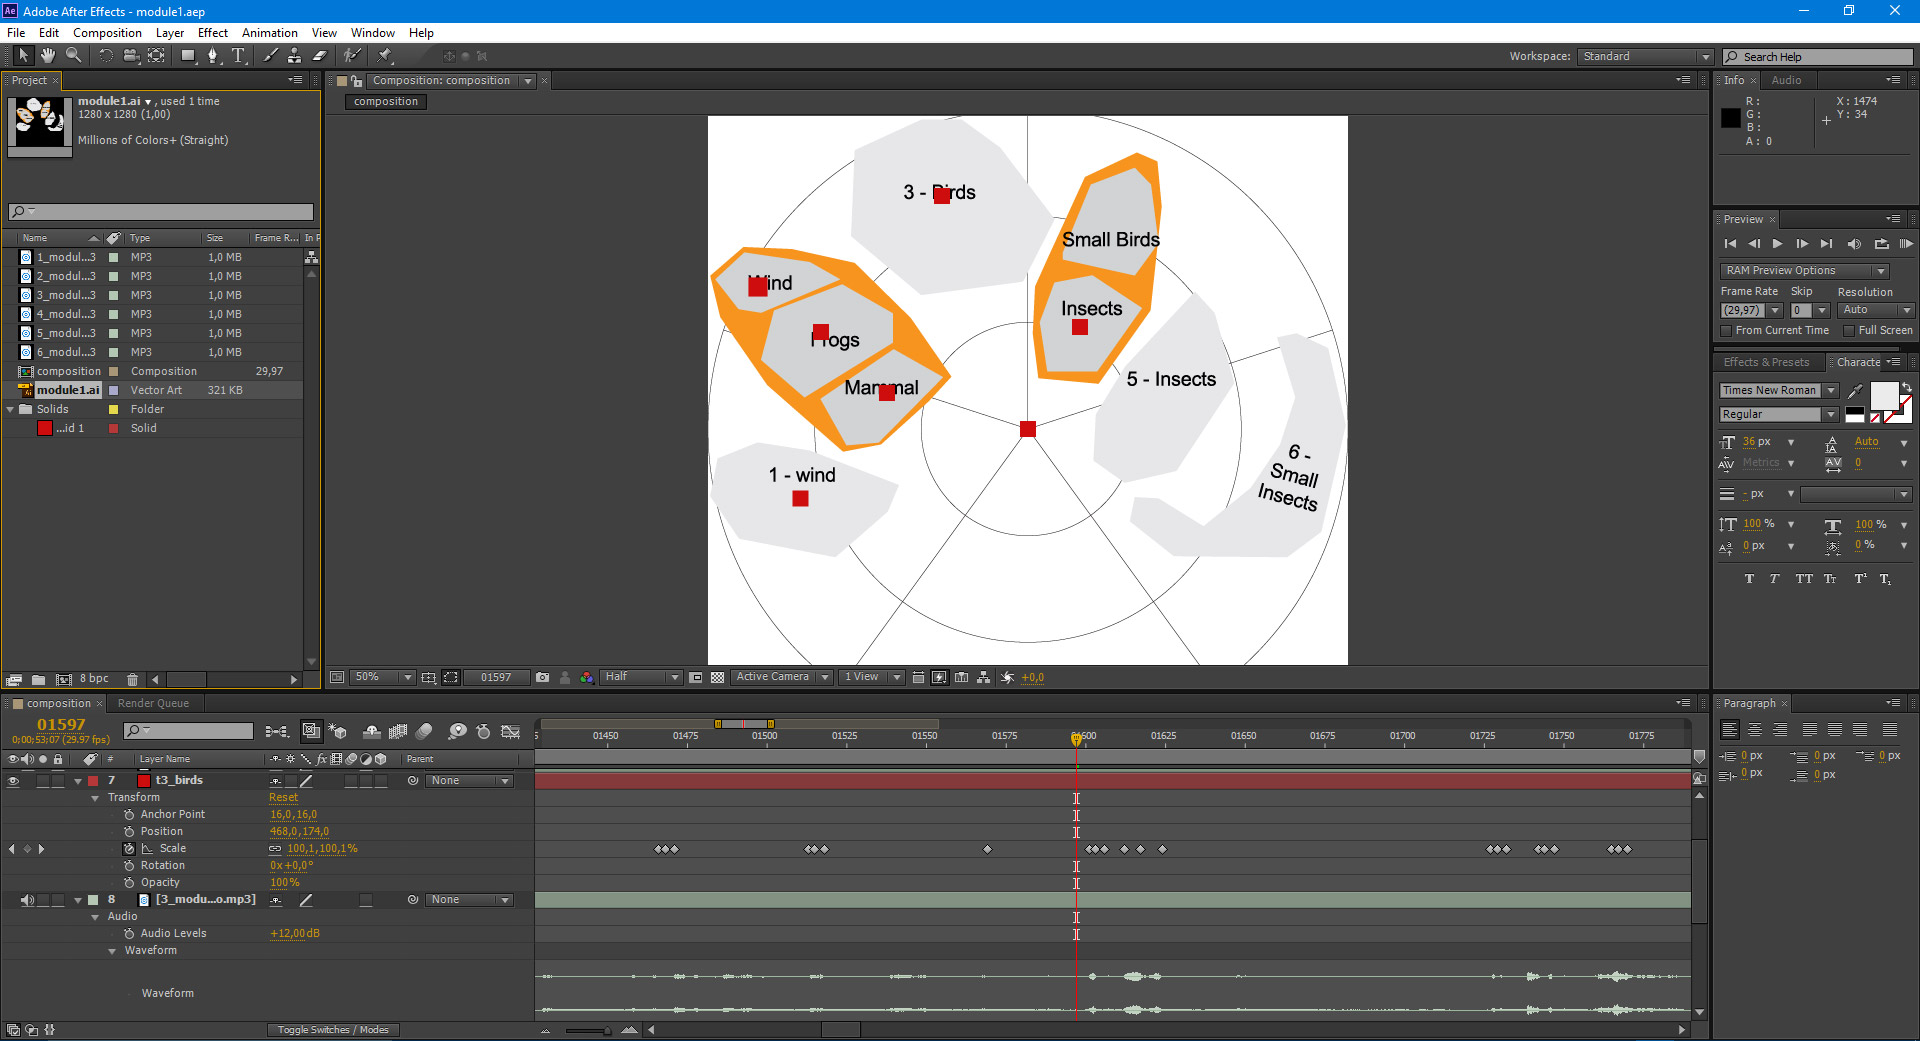
the grey shapes represent the individual species found in each soundtrack, the orange shapes are sound tracks that contain different species. Each red square is a placeholder that receives transformations over time. there are 4 types of transforms that can be stored and reflected at runtime:
- position: describes an XY offset around the origin rather than absolute coordinates
- rotation: describes the min/max rotations at a given time
- scale: same for scale on the 2 axes
- opacity: used to trigger the sprites playback
When the timelines are ready, we use a script to collect all the keyframes of each timeline and store them as a JSON file. The After Effects keyframes’ export script is available here if you’re interested.
After having done a prototype, we agreed this was the way to go and I started creating the timelines for the module 1 (6 tracks) manually. Quickly enough, it appeared that some soundtracks contained way too many events to be processed manually. So I tried a procedural approach based on the sound’s spectrogram ; that’s how Bernie Krause himself isolates the different species inside a sound.
below is an example of a track automatically analysed:
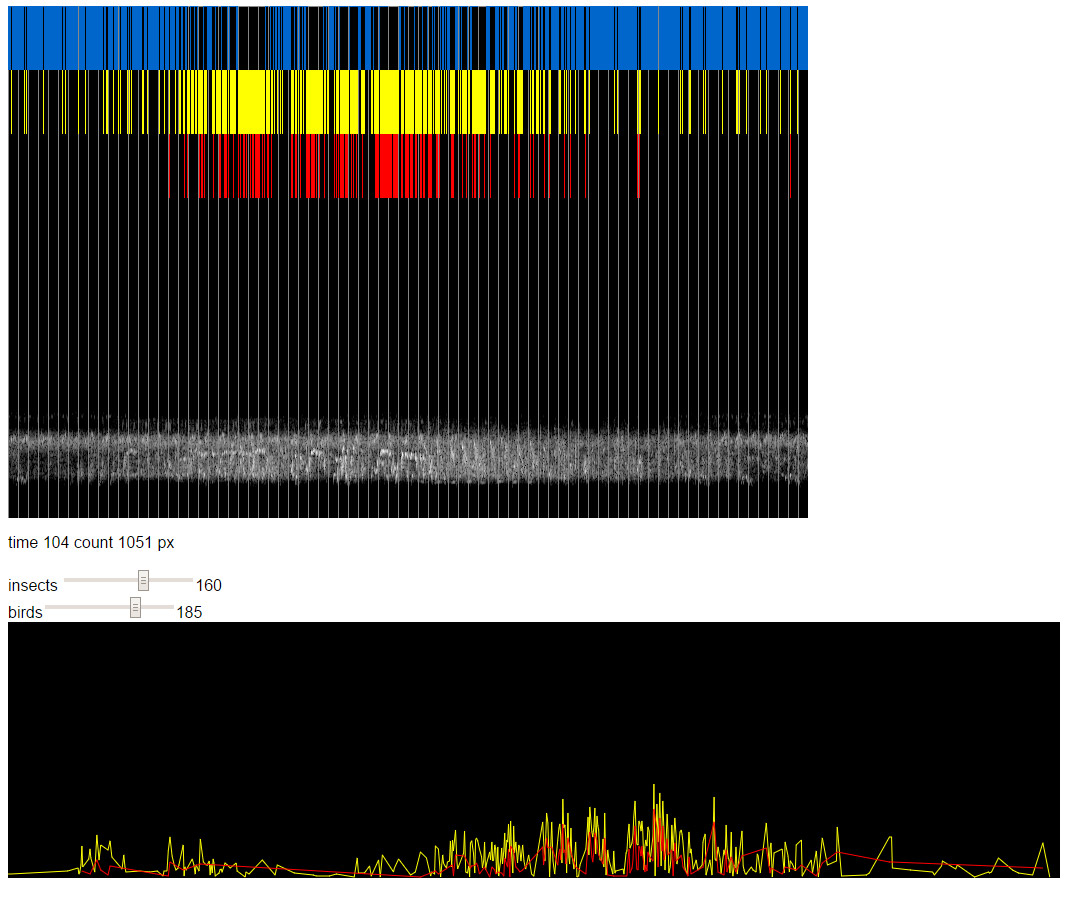
the top picture is a “scan” of the soundtrack, the vertical grey lines represent the seconds, the greyish cloud at the bottom is the spectrogram. the colored lines represent various “events” extracted from the sound, they depend on arbitrary thresholds: yellow lines represent the insects, red lines represent the birds. the bottom graph is a smoothed representation of the series of events.
As magical as this may seem, we didn’t use this technique. For one, the thresholds have to be set up manually, empirically but mostly the results were too mechanical, some clearly audible events were not detected while other minor events were given way too much room.
Back to After EFfects and manual work, here’s a sample of the timelines of the 1st module (there is 4 times more keys)

or the 4th module (three times more keys in total)

This tedious, precise and careful work allowed us to remain very close to what is actually felt when listening to the tracks. When an animal shouts or whispers, there is a visual response.
colossal masses
The timelines allow us to control precisely each “family” of shapes, to trigger discrete and/or continuous events at any given time on one or more dimensions (position, rotation, scale and timelines). As each family is represented by many individuals, we had to find a way to batch process them rather than controlling them individually.
My first idea was to define polygonal zones corresponding to the actual frequencies distributions of the various species and distribute the individuals at random, using a rough “polygon contains” method and a PRNG (so that we obtain the same distributions every time). Again this produced unwanted artefacts like superimposition and disgraceful distributions like the one below.

there are ways to prevent superimposition (a Poisson Disc Distribution for instance) yet I don’t know of any algorithm to make “good looking” distributions. So for each module, we manually created the initial distributions in Illustrator by using symbols and transforming them to match the artworks distribution. Then we exported the result to Flash where we collected all the transform matrices of both the sprites and their shadows.

In yellow, the pictograms rendered in white, in red, their shadows.
this is the script used to collect all the transforms matrices and store them as a,b,c,d,tx,ty values.
|
1 2 3 4 5 6 7 8 9 10 11 12 13 14 15 16 17 18 19 20 21 22 23 24 25 26 27 28 29 30 31 32 33 34 35 36 37 38 39 40 41 42 43 44 45 |
import flash.display.MovieClip; import flash.events.Event; import flash.geom.Matrix; //collects all clips transforms var frames:Object = {}; for( var i:int = 0; i< this.numChildren; i++ ) { var mc:DisplayObject = this.getChildAt( i ); var n:String = mc.name; if( n.lastIndexOf( "instance" ) != -1 )continue; frames[n] = []; } var scope:MainTimeline = this; function oef(e:Event):void { for( var i:int = 0; i< this.numChildren; i++ ) { var mc:DisplayObject = this.getChildAt( i ); var n:String = mc.name; if( n.lastIndexOf( "instance" ) != -1 )continue; var mat:Matrix = mc.transform.matrix; frames[n].push( mat.a, mat.b, mat.c, mat.d, mat.tx, mat.ty ); } var precision:Number = 10000; var str:String = '"transforms" : {\n'; for( var key:String in frames ) { str += '"' + key + '" : ['; var values:Array = frames[ key ]; for( i = 0; i < values.length; i++ ) { str += Math.round( Number( values[i] ) * precision ) / precision+ ','; } str = str.substr( 0, str.length - 1 ); str += '],\n'; } str = str.substr( 0, str.length - 2 ) + '\n}\n' ; trace( str ); this.removeEventListener( Event.ENTER_FRAME, oef ); stop(); } this.addEventListener( Event.ENTER_FRAME, oef ); |
The benefit was that we could also use powerful shape animation features along with the “spritesheet export” of Flash which provided a solid pipeline for assets creation. On a side note, Flash, like most Adobe products export UTF-16 encoded JSONs, it’s ok to use them on most browsers but Firefox says NO, this was an extra clean up step we regularly forgot about.
We obtained a compact format to describe many clips’ transforms (for instance, there are 281 clips on the module 1)
|
1 2 3 4 5 6 7 8 9 10 11 12 13 14 15 16 17 18 19 20 21 22 23 24 25 26 27 28 29 30 31 32 |
"transforms" : { "t6_insects" : [-0.1025,-0.0417,0.1109,-0.2727,1157.45,443.5,-0.0985,0.0505,-0. [...] "t5_insects_shdw" : [0.0041,0.3295,-0.7869,0.0098,1010.05,377.9,-0.281,0.248,-0 [...] "t4_birds2" : [0.3489,-0.251,-0.2901,-0.4032,860.65,152.75,0.3799,-0.2009,0.255 [...] "t2_frogs_shdw" : [1,0,0,1,240.3,469.3,0.9405,0,0,0.8254,289.55,483.3,-0.8718,0 [...] "t4_birds1" : [-0.3702,-0.0634,-0.0926,0.5413,910.6,263.75,0.3217,0.0551,-0.100 [...] "t6_insects_shdw" : [-0.1025,-0.0417,0.1109,-0.2727,1152.45,448.5,-0.0985,0.050 [...] "t2_mammal_shdw" : [1,0,0,1,370.7,511.05,0.6059,-0.4201,0.4201,0.6059,297,548.5 [...] "t2_wind_shdw" : [0.506,-0.1745,0.3388,0.9826,179.8,401.85,0.6263,-0.0018,0.001 [...] "t6_small_insects_shdw" : [-0.7581,0,0,-0.7581,1039.35,801.65,0.6071,0,0,0.6071 [...] "t1_wind_shdw" : [0.9481,-0.3181,0.3181,0.9481,293.4,736.2,0.7138,-0.1925,0.194 [...] "t4_birds1_shdw" : [-0.3702,-0.0634,-0.0926,0.5413,905.6,268.75,0.3217,0.0551,- [...] "t6_small_insects" : [-0.7581,0,0,-0.7581,1044.35,796.65,0.6071,0,0,0.6071,1155 [...] "t4_birds3_shdw" : [0.2767,0.0008,-0.0017,0.5529,881.6,172.05,-0.1937,0.1754,0. [...] "t4_birds2_shdw" : [0.3489,-0.251,-0.2901,-0.4032,855.65,157.75,0.3799,-0.2009, [...] "t3_birds3" : [0.394,-0.0695,0.1543,0.8752,702.65,187.65,0.3414,0.3206,-0.5794, [...] "t2_mammal" : [1,0,0,1,375.7,506.05,0.6059,-0.4201,0.4201,0.6059,302,543.55,0.5 [...] "t3_birds2" : [0.8214,0.2414,-0.2414,0.8214,508.8,65.75,0.5126,-0.0298,0.0514,0 [...] "t3_birds1_shdw" : [0.7409,-0.4748,-0.5083,-0.7932,463.4,180.55,1.0013,0.2431,0 [...] "t3_birds1" : [0.7409,-0.4748,-0.5083,-0.7932,468.4,175.55,1.0013,0.2431,0.0549 [...] "t2_wind" : [0.506,-0.1745,0.3388,0.9826,184.8,396.85,0.6263,-0.0018,0.0018,0.6 [...] "t3_birds3_shdw" : [0.394,-0.0695,0.1543,0.8752,697.65,192.65,0.3414,0.3206,-0. [...] "t4_insects" : [0.3238,0.0609,-0.0722,0.3842,797.1,316.85,0.0947,0.183,-0.3472, [...] "t6_bat" : [-0.0287,-0.1662,-0.8116,0.1403,934.75,852.55,-0.1158,-0.1908,-0.397 [...] "t6_bat_shdw" : [-0.0287,-0.1662,-0.8116,0.1403,929.75,857.55,-0.1158,-0.1908,- [...] "t3_birds2_shdw" : [0.8214,0.2414,-0.2414,0.8214,503.8,70.75,0.5126,-0.0298,0.0 [...] "t4_insects_shdw" : [0.3238,0.0609,-0.0722,0.3842,792.1,321.85,0.0947,0.183,-0. [...] "t4_birds3" : [0.2767,0.0008,-0.0017,0.5529,886.6,167.05,-0.1937,0.1754,0.1927, [...] "t5_insects" : [0.0041,0.3295,-0.7869,0.0098,1015.05,372.9,-0.281,0.248,-0.453, [...] "t1_wind" : [0.9481,-0.3181,0.3181,0.9481,298.4,731.2,0.7138,-0.1925,0.1944,0.7 [...] "t2_frogs" : [1,0,0,1,245.3,464.3,0.9405,0,0,0.8254,294.55,478.3,-0.8718,0,0,-0 [...] }, |
Each individual is represented by 6 digits, not only does this format allow to store the transforms (position, rotation, scale) in a compact way but it also allows to render them faster as it is very close to the way the canvas 2D works. The following is a snippet from the render loop:
|
1 2 3 4 5 6 7 8 9 10 11 12 13 14 |
//save the context's state ctx.save(); //apply this clip's transform from the 6 digits ctx.setTransform( p.a, p.b, p.c, p.d, p.x, p.y ); //blits the sprite onto the canvas //"re" holds the sprite's coordinates on the spritesheet ctx.drawImage( scope.spritesheet, re.x, re.y, re.w, re.h, -re.w / 2, -re.h / 2, re.w, re.h ); //get ready for the next object ctx.restore(); |
Even so, the high number of elements to draw was causing poor performance on older hardware and – of course – mobile devices so we opted for a “dynamic decimation” strategy based on the user’s screen resolution. The bigger the screen, the more numerous the individuals, the smaller the screen the fewer, consider the following screenshots:

I was really sad not to be able to do better than this on mobile devices but the framerate dropped so low that we didn’t have a choice.
This “dynamic decimation” feature is also used intentionally in the third module to represent the – actual – decimation of animal species in the Lincoln Meadow.
a touch of procedural animation
To add some extra life to the pictograms, we’ve added a touch of code. In order for the playback of timeline animations not to be too mechanical, we introduced some randomness ; when an event collected from After Effects is triggered, all the members of a family play it with a little time offset, this is very visible on the bigger sprites and gives a sensation of uniqueness.
To get a more natural motion, we’ve added a “motion noise” ; a constant infra-noise based on vector fields where each sprite would move according to its weight (based on the surface of the sprite). The texture used to create the vector field provides various qualities of motion. A visual explanation might be simpler to grasp ; imagine that the following pictures are satellite views where mountains are white and the valleys are dark.
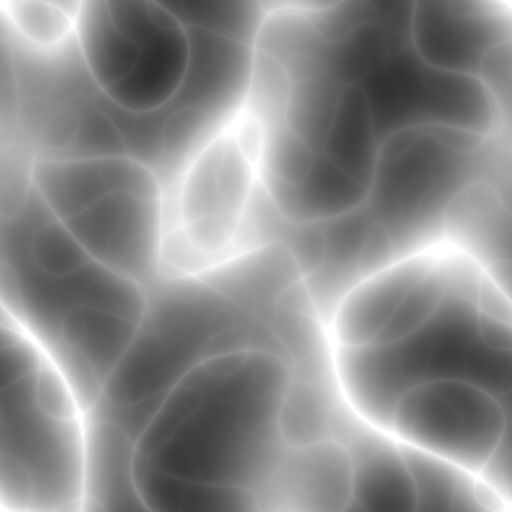
the above would be sharp mountains and below would be eroded volcanoes.

Now imagine that each animal constantly goes up and down this landscape, their speed will vary depending on the slope and their weight. That’s exactly how the motion noise is computed. We also added a mouse interaction ; the animals will try to flee when the user clicks and with this addition to the animations, the path they use will be slightly different when they flee and when they come back to their original position.
computing the vector field is straight forward, it’s about getting the central difference of each pixels and is done as follow:
|
1 2 3 4 5 6 7 8 9 10 11 12 13 14 15 16 17 18 19 20 21 22 23 24 25 26 27 28 29 30 31 32 33 34 35 36 |
function getPixel( data, width, x, y ) { var id = ( x + width * y ) * 4; var r = data[id]; var g = data[id+1]; var b = data[id+2]; var a = data[id+3]; return {r:r, g:g, b:b, a:a } } var iw = img.width; var ih = img.height; var src = src == null ? getContext(iw, ih) : src; src.canvas.width = iw; src.canvas.height = ih; src.drawImage(img, 0, 0, iw, ih); var data = new Float32Array( iw * ih * 2 ); var imgData = src.getImageData(0,0, iw, ih); var dat = imgData.data; var i = dat.length; var did = 0; while( i-=4 ){ var id = i/4; var px = id % iw; var py = ~~( id / iw ); var xl = getPixel( dat, iw, Math.max( 0,px-1 ), py ).r; var xr = getPixel( dat, iw, Math.min( iw-1, px+1 ), py ).r; var yt = getPixel( dat, iw, px, Math.max( 0, py-1 ) ).r; var yb = getPixel( dat, iw, px, Math.min( iw-1, py+1 ) ).r; data[ did++ ] = ( xl - xr ) / 0xFF; data[ did++ ] = ( yt - yb ) / 0xFF; } |
now data contains the central difference for each pixel, note that I’m only using the red value as I’m using a greyscale image so the getPixel() returning an object is overkill here but this is N-dimensional so we could use a RGB noise to obtain a 3D central difference (or even a RGBA of course).
now to get the direction in which a point should go, we only need to sample data at the appropriate location, something along the lines of:
|
1 2 3 4 5 |
var i = ~~( p.x ) % iw; var j = ~~( p.y ) % ih; var id = ( ( i + j * iw ) * 2 ); p.x += data[ id ]; p.y += data[ id + 1 ]; |
Depending on the texture, we added more water like or wind like motions. Here’s an example, where the dots tend to come back to their origin.
the code is available here
To wrap it up
This website is more complex than it looks, it required the production of a great number of “custom assets” specifically designed to solve technical problems. The team was very dedicated to find the best possible solution while making no concession on the quality of the result (be it the sounds, the graphics or the animations). It’s the first time that I see so much talent and so much dedication in making the project as good as possible and it is very gratifying to have been part of this adventure.
Wow. I mean… holy shit! How much time does it take you to write a post like this? A week?
haha we finished “early” and I wanted to document the process because otherwise I would never do it :) (took me 4 days)
Very cool project ! It reminds me the Flash period
– amused to see you finally re-opened it :) –
But :)
Why don’t you use webGL for the rendering part ?
I’m not 100% sure but I think the blend modes should work as expected everywhere since it’s based on very low-level stuff, and it’s possible to compute every photoshop-blendmode using webGL, then it would be easier to realize I think (maybe not, I’m not 100% sure of what I’m saying)
I know that not every mobile devices support webGL but most of them does and results are impressive.
Just to be clear, your work is great but I don’t understand why you choosed context2D instead of context3D.
I worked a lot with canvas2D but when I saw that I was able to run hundreds of thousands particles at 60 frames by second on my phone with webGL, I almost never touched canvas2D anymore.:)
I thought you would do the same, I’m surprised !
Always happy to see your work anyway :)
hey!
no WebGL because IE (not Edge, IE 9,10,11), the website runs very slowly on those browsers and there are really weird graphic bugs but it works :)
I know the benefits of using a GPU accelerated rendering context and – indeed – life would have been easier if I used it :)
for instance to draw the wheel I need to: draw an arc CW with the outerRadius, draw an arc CCW with innerRadius, use the “ctx.clip()” method and then perform the draw operations inside a clipped space, it’s horribly slow.
in GLSL, the same result is achieved by simply doing: color *= step( inRadius, uv ) * step( uv, outRadius );
hopefully, one day, we won’t have to deal with older browsers :)
I forgot the existence of IE …
I just read again your post and I missed this line
“Many a time, I dreamt of having the right to use a WebGL context because you know… WebGL…”
And yes, I know :)
Well done !
lucky you! :) to all possible extents, IE is a despicable pile of crap. can’t wait for it to disappear from the surface of this planet.
now, our clients have corporate computers running IE only (poor them…) and they were very happy to be able to see the website too :)
Very great post. Thanks for sharing your expirements. Greatly appreciated.
Awesome job on the website.
thank you :)
why not using css for gradients ? steps are doable, transitions as well and it would accelerated by gpu natively. right ?
can flash (animate cc) export animations to css?
I don’t think so but it would be nice :)
the animation property is better and better supported and we could easily convert some colors, transforms & other properties to match the CSS format :)
the hardest part here would be to find people willing to use Flash ^^’
hi, I tried :)
the CSS code is pretty complex if you want to make it cross browser ( see: http://www.colorzilla.com/gradient-editor/ ) and quite hard to update as you need to convert the same values to different formats, it’s not impossible though.
more importantly, the CSS interactions will cause at least a repaint and a composite operation, this will have to be done on the whole full size background, which means the composite ( even if GPU accelerated ) may be slow as opposed to blitting a smaller canvas onto the bigger one.
creating a gradient is extremely fast (somewhere around 3,4 microseconds in my tests), so the fact of setting up the canvas to paint 20 different gradient steps doesn’t really slows down the render. on the other hand, filling a large area is a time consuming task, that’s why I used a very small canvas to draw the gradients and used the built in (and probably GPU accelerated) bilinear filter to scale them up :)